Laboratory Training 4
Development of Graphical User Interface Applications
1 Training Assignment
1.1 Individual Task
It is necessary to implement in Java language with the help of JavaFX tools the graphical user interface application, in which the data processing of individual tasks of previous laboratory trainings is carried out. The main window should contain a menu in which you need to implement the following functions:
- creating a new data set
- loading data from an XML document for editing
- storing the changed data in an XML document
- search according to the criteria specified in the Laboratory training # 5 of the course "Fundamentals of programming" (second part)
- sorting according to the criteria specified in the Laboratory training # 1 of the course "Object-oriented programming" (first part)
- receive "About" window with short data about the program and the author.
In the left part of the window, you should arrange the boxes for entering the scalar data, the display area for the search results, and the buttons that provide the basic functions of the program. In the middle of the window, you should place a table to display and edit the data.
1.2 Mini Calculator
Create a graphical user interface application, which, after entering numbers in two boxes of TextField type, performs one of four arithmetic operations (depending on the radio button selected). The result should be displayed in a different text field.
1.3 Dictionary
Develop a GUI application for viewing the words of a small English-Ukrainian (English-Russian) dictionary. Implement search functions for words, adding new words. Use Map to store data.
1.4 Dictionary for Training (Advanced Task)
Develop a graphical user interface program for English language proficiency testing, in which English words are displayed in an arbitrary order, and the user selects a possible translation.
2 Instructions
2.1 Using Java to Create Graphical User Interface Applications (GUI Applications)
2.1.1 Overview
User interface is a set of means by which people interact with computers. We'll speak about software means of user interface.
A command line interface is a method of interacting with software using a command line interpreter. The result of command execution is displayed on the screen in so called text mode or in special console window. Applications which support this kind of user interface are called console applications. These applications do not react system messages and do not send messages to other applications.
Graphical user interface (GUI) allows the user to interact with the computer using graphical controls (windows, icons, menus, buttons, lists, etc.) and technical positioning devices, such as mouse device. In contrast to command line interface, GUI provides user random access to screen objects. Applications which implement this kind of interaction are called GUI Applications.
The implementation of GUI is based on so called event handling mechanism. The whole GUI program consists of initialization part, which contains visual components registration, and main loop of events obtaining and events processing. Events such as moving mouse, pushing mouse buttons, pressing keys, etc., are transferred to appropriate controls by invocation of their functions called event handlers.
Graphical user interface development tools are an integral part of Java technology since the very beginning of Java. The first library that provided tools for creating graphical interface programs was the Abstract Window Toolkit (AWT) library. AWT is part of the Java Foundation Classes (JFC), a standard API for implementing a graphical interface for a Java application. In the early years of its existence, the Java AWT library was used primarily to create applets.
The main disadvantage of the AWT library is the focus on graphical dialog components that provide specific operating systems and graphics environments. This leads, on the one hand, to certain problems with the deployment of the program on different software platforms, on the other hand, restricts the expressive means of the application, since it is necessary to focus only on those visual components that are present on all platforms. Such visual components are called "highweigh". This and other AWT drawbacks are fixed in the Swing library. The Swing library also provides some additional visual components, such as a bookmarks bar, drop down lists, tables, trees, and more.
Now standard Java graphical user interface development tools have AWT and Swing libraries, as well as the JavaFX platform, which is an alternative to Swing. In addition, various developers provide alternative non-standard libraries, such as Qt Jambi, Standard Window Toolkit (SWT), XML Window Toolkit (XWT). The last two libraries, along with AWT and Swing, are supported by Eclipse.
2.1.2 Creating and Using Applets
Applets are software components written in Java that are stored on a web server, loaded onto a client computer, and executed using the Java virtual machine built into the client's web browser.
All you need to perform the applet is contained in the <applet> tag in the text of the HTML file. The applet is usually responsible for a certain rectangular area in the browser window. The coordinates of this area can also be specified in the <applet> tag. For example:
<applet codebase = "." code = "test.Applet1.class" width = 400 height = 300>
</applet>
The codebase attribute specifies the location of the class that implements the applet (in the example given, the current folder). The code attribute is the class name. The width and height attributes specify the size of the applet window.
The java.applet.Applet (Java 1) and javax.swing.JApplet (Java 2) classes are used as base classes to implement applets. The life cycle is determined by the following methods of the Applet class:
public voidinit()is invoked by the browser immediately after loading the applet before the first call of thestart()method; this method needs to be redefined almost always, if an applet needs at least some kind of initialization;public voidstart()is called by the browser every time the page is visited;public void stop()is invoked by the browser during the deactivation of the page;public voiddestroy()always invoked when exiting the browser and rebooting the applet.
For security reasons, applets are subject to certain restrictions:
- applets downloaded over the network are prohibited from reading and writing files from the local file system;
- applets should not perform network connections to all hosts, except from which the applet was received;
- applets are not allowed to run programs on the client system;
- applets are not allowed to load new libraries and call programs external to the Java machine.
The applet can be viewed using the program appletviewer.exe, which is part of the JDK. Almost any Java application dialog can be implemented so that it can work both as a program and as an applet. However, the applet does not require the main() function.
Problems with using applets are related to the need to ensure the availability of the appropriate version of Java, which is supported by the client's Web browser.
2.1.3 Using the javax.swing Library
The javax.swing library (Swing library) provides a set of standard classes which can be used for development of graphical user interface (GUI) applications. The Swing library was extended previously developed AWT (Abstract Window Toolkit) library. Swing provides an extended set of visual controls and improved event model. In contrast to AWT classes, class names of visual controls defined in Swing library start with J letter (for example, JButton, JPanel, etc.).
Unlike the AWT components, Swing components are lightweight. This means that the Swing components use the Java tools to display graphical user interface elements on the window surface without using the components of the operating system.
Like most GUI libraries, the javax.swing library supports the concept of the main application window. This main window is created as an object of the JFrame class, or derived from it. Next, the visual components are added to the main window - labels (JLabel), buttons (JButton), input strings (JTextField), etc.
Development of the simplest Swing application starts with creation of a new class with main() function. It is necessary to add an import statement:
import javax.swing.*;
We can create a new frame in main() function. The constructor's argument is used for setting of window title:
. . .

public class HelloWorldSwing {
    public static void main(String[] args) {
       JFrame frame = new JFrame("Hello");
       . . .
    }
}
Next, we add a new label to the component that is responsible for the contents of the window. A new JLabel object is created:
frame.getContentPane().add(new JLabel("Hello world!"));
The pack() method adjusts size of main window. The call of setVisible(true) function causes appearance of this window on the screen. Here is the full text of the program:
package ua.in.iwanoff.java.fourth;

import javax.swing.*;

public class HelloWorldSwing {
    public static void main(String[] args) {
        JFrame frame = new JFrame("Hello");
        frame.getContentPane().add(new JLabel("Hello world!"));
        frame.pack();
        frame.setVisible(true);
    }
}
Next, you can add other visual components and event handlers to the program.
The visual components of the Swing library are inherited from the javax.swing.JComponent class, the successor of the java.awt.Container class. In turn, this class is the successor of java.awt.Component. The java.awt.Component class is the base class that defines the display on the screen and the behavior of each interface element when interacting with the user. The class methods responsible for managing events allow you to specify the size, color, font, and other attributes of controls. For example, the setBackground(Color) method sets the color of the component background, setFont(Font) sets the font (java.awt.Color and java.awt.Font are classes that allow you to set a certain color and font). The JComponent class extends the capabilities of the base classes by supporting the Look & Feel, using hotkeys, tooltips, and some other features. The Swing library allows you to change visual style of user interface (Look & Feel) according to style conventions of particular operating environment. A special UIManager class is used to control the style. By default, the cross-platform style ("metal") is adopted. In order to set the style adopted on a particular operating system, the following code should be added to the window initialization:
try {
    UIManager.setLookAndFeel(UIManager.getSystemLookAndFeelClassName());
}
catch (Exception ex){
    ex.printStackTrace();
}
The use of visual components is based on the application of Java Beans.
2.2 Use of JavaFX Tools
2.2.1 Overview
From the beginning, JavaFX tools were created as a software platform for creating rich internet applications, defining the architecture, framework and application development style. Since JavaFX provides a large number of interfaces and classes for developing graphical user interface applications, JavaFX is actually a modern alternative to the javax.swing library. The first version of the platform (JavaFX 1.0) came out in 2008 and included a special scripting language JavaFX Script for describing the graphical interface. In 2011, JavaFX 2.0 was released under the leadership of Oracle. The developers of this version have abandoned a special scripting language in favor of Java. The version of JavaFX 8, which was released in 2014, is developed in accordance with the capabilities and style of Java 8, provides opportunities to work with 3D graphics, and also offers new visual components. The version number corresponds to Java 8, so versions 3, 4, 5, 6 and 7 are missing.
The main features that distinguish JavaFX from previous graphical user interface libraries are the following:
- built-in support for MVC design pattern (Model-View-Controller)
- ability to declare a visual description of the components (FXML language)
- modern style of visual components
- support for enhanced user interaction with the application
- the ability to use css styles to stylize elements of the user interface
- the ability to use 3D graphics
- simplified application deployment model
There are also a number of additional features related to graphics, text, interaction with previously created libraries, and more.
The JavaFX platform can be considered an alternative to previous GUI libraries, which is intended to completely replace them later.
2.2.2 Creating the Easiest Application. JavaFX Application Structure
The easiest application for the graphical user interface that uses the JavaFX library can be created by including all the necessary components directly in the Java code. For example, the following class derived from javafx.application.Application allows you to create a window with a button in the middle:
package ua.in.iwanoff.java.fourth;

import javafx.application.Application;
import javafx.stage.Stage;
import javafx.scene.Scene;
import javafx.scene.layout.FlowPane;
import javafx.geometry.Pos;
import javafx.scene.control.Button;

public  class Main extends Application {

    @Override
    public  void start(Stage primaryStage) throws Exception {
        // Set the window title:
        primaryStage.setTitle("First Java FX Application");

        // Create a root container and set the centering of the child elements
        FlowPane rootNode = new FlowPane();
        rootNode.setAlignment(Pos.CENTER);

        // Create a scene and set it up in the stage
        Scene scene = new Scene(rootNode, 300, 200);
        primaryStage.setScene(scene);

        // Create a button, define the action when it is pressed
        // and insert the button in the root container:
        Button button = new Button("Press me");
        button.setOnAction(event -> button.setText("Do not press me"));
        rootNode.getChildren().add(button);

        // Show the window:
        primaryStage.show();
    }

    public  static  void main(String[] args) {
        launch(args);
    }
}
In the example above, the function that handles the event associated with the button click is implemented using the lambda expression.
Resource files (e.g. bitmap images) can be placed in a separate directory of the project.
JavaFX components form a hierarchy of objects. The application must contain at least one Stage type object. Stage fields determine the properties of the window that is its owner: the style of the window, its type (for example, modal / nonmodal), the title, etc. Stage type object is the top level container containing the scene (Scene component). The scene is a container for other visual components.
2.2.3 Using JavaFX Tools in the Eclipse Environment
To develop JavaFX applications in the Eclipse environment, some preparatory steps are required:
- install JDK 1.8 on your computer (latest version)
- install e(fx)lipse plugin
- install the Scene Builder application
If JDK tools are not installed on your computer, you can download them from http://www.oracle.com/technetwork/java/javase/downloads/index-jsp-138363.html#javasejdk. Once JDK 1.8 is installed on your computer, you must configure the Eclipse environment to work with the installed version of JDK. In the Eclipse options (Window | Preferences) , choose Java | Installed JREs, then Add... | Next | Directory.... You must select the JDK that was previously set and click Finish. After that, in the list of installed JREs, select the JDK to be installed by default and click OK.
If the project was created before, you should set JDK as the default JRE in the project options. In the main menu, choose the Project | Properties | Java Build Path function, then select the JRE System Library on the Libraries tab, press the Edit... button, switch System Library to Alternate JRE, and select the previously installed JDK in the appropriate line.
Note: you should also check that the required compiler compliance level is also determined: Window | Preferences main menu, then in the tree branch Java | Compiler set Compiler compliance level to 1.8.
To install e(fx)lipse plugin in the Eclipse environment, use the main menu function Help | Install New Software..., then in the Install window on the Work With line enter an address http://download.eclipse.org/efxclipse/updates-released/1.2.0/site. In the middle of the window, a list of software tools will be displayed, among which you can select e(fx)clipse - install and click Next. After some time, the install details will be displayed in the window and we will press the Next button again. Next, you must accept the terms of the license and click Finish. After installing the necessary software, you need to reboot the IDE Eclipse.
Now you can create the first JavaFX application. Create a new JavaFX project (File | New | Project... in the New Project window, select JavaFX | JavaFX Project and click Next). Enter the name of the project, for example "HelloFX", and click Finish. This project can start, and you'll get an empty window in the middle of the screen.
2.2.4 Setting Up the IntelliJ IDEA Environment for Creating JavaFX Applications
The IntelliJ IDEA IDE provides a special plugin that allows you to create JavaFX projects. To do this in IntelliJ IDEA, you need to do some preparatory steps:
- make sure the JDK version is not less than 1.8.4
- check whether the required JavaFX plugin is turned on; this can be done in the following way:
- in the Settings window (File | Settings.. menu command) of IntelliJ IDEA select the Plugins position
- find plugin JavaFX in the list of plugins; if it is disabled, turn it on.
You can create a new JavaFX project by selecting the Java FX project wizard on the left side of the window. On the next page of the wizard you should enter the name of the project, for example, FirstFX. A program that shows an empty window with the title Hello World is automatically created. The project contains a sample package with three files:
Main.javacontains theMainclass, derived fromjavafx.application.Application. This class contains themain()function.Controller.javacontains an empty class, to which you'll add event handlers.sample.fxmlcontains a description of user interface elements. The file contains a reference to theControllerclass.
The names of the created package and files can be changed using refactoring tools.
If you want to add a JavaFX application to an existing project, you can do this as follows: select the desired package in the tree and use the function of the context menu New | JavaFXApplication. Next, in the New JavaFXApplication window, enter the application name. Thus, IntelliJ IDEA only generates a class derived from javafx.application.Application.
2.2.5 Use FXML to Markup GUI Elements
Modern concepts of designing a graphical user interface provide a declarative way of defining the contents of windows (frames, activities) and the properties of visual components. The most popular approach is the use of XML, which provides an adequate description of the hierarchy of visual objects through the mechanism of nested tags and the definition of properties of components through the use of attributes. Different languages built on XML are used in Android, .NET (WPF), and more. Using the declarative description of the user interface allows more precisely separating the data and algorithms (model) from the elements of the user interface (view) and provide their connection through a special class, the so-called controller, which usually contains event handlers, concerned with visual elements. In addition, the declarative language for describing the appearance and controls allows use designers for which XML-like declarative language is more acceptable than programming languages.
The first version of JavaFX included a separate scripting language, the so-called JavaFX Script, which allowed declaratively describe the components of the user interface. Starting with the second version of JavaFX, the authors of the platform abandoned JavaFX Script and added to the specification an XML-based user interface description language called FXML. The use of FXML is not the only, but recommended approach.
In order to use FXML, when creating a new project on the third page of the wizard of the new JavaFX Project project, in the Declarative UI panel in the Language list, specify FXML. A Sample.fxml FXML document and a SampleController class controller will be added to the project (these names can be changed). The default content of the Sample.fxml file will be the following (if the application package name has not been changed):
<?xml version="1.0" encoding="UTF-8"?>

<?import javafx.scene.layout.BorderPane?>

<BorderPane xmlns:fx="http://javafx.com/fxml/1" fx:controller="application.SampleController">
    <!-- TODO Add Nodes -->
</BorderPane>
The SampleController class is still empty:
package application;

public class SampleController {

}
The contents of the Main class will be somewhat different from the preceding examples. Now the root object of the component hierarchy is not created using new, but is loaded from the FXML file:
package application;

import javafx.application.Application;
import javafx.stage.Stage;
import javafx.scene.Scene;
import javafx.scene.layout.BorderPane;
import javafx.fxml.FXMLLoader;

public class Main extends Application {
    @Override
    public void start(Stage primaryStage) {
        try {
            BorderPane root = (BorderPane)FXMLLoader.load(getClass().getResource("Sample.fxml"));
            Scene scene = new Scene(root,400,400);
            scene.getStylesheets().add(getClass().getResource("application.css").toExternalForm());
            primaryStage.setScene(scene);
            primaryStage.show();
        } catch(Exception e) {
            e.printStackTrace();
        }
    }

    public static void main(String[] args) {
        launch(args);
    }
}
Now you can add visual elements to the FXML file. For example, you can add a button:
<?xml version="1.0" encoding="UTF-8"?>

<?import javafx.scene.control.*?>
<?import javafx.scene.layout.BorderPane?>

<BorderPane xmlns:fx="http://javafx.com/fxml/1" fx:controller="application.SampleController">
    <top>
        <Button text="Press me" />
    </top>
</BorderPane>
In addition to the button itself, you need to add an import directive (<?import javafx.scene.control.*?>) and indicate that the button will be added at the top of the panel (inside the <top> tag). As seen from the above example, the visual components described in FXML file can be anonymous. If you want to add a name (identifier), this can be done in the FXML file code:
<Button text="Press me" fx:id="button"/>
In order not to identify an error, you must add a description of the corresponding field to the class controller. This can be done using Quick Fix shortcut menu. Similarly, you can add a reference to the event handler function onAction:
<Button text="Press me" fx:id="button" onAction="#doPress"/>
The SampleController class will now be as follows:
package application;

import javafx.fxml.FXML;
import javafx.scene.control.Button;
import javafx.event.ActionEvent;

public class SampleController {

    @FXML
    Button button;

    @FXML
    public void doPress(ActionEvent event) {}

}
The @FXML annotation is used to refer to variables and functions associated with the tags and attributes of the FXML file.
Inside the doPress() function body you can add the required code, for example:
    @FXML
    public void doPress(ActionEvent event) {
        button.setText("Do not press me");
    }
You can also add a new FXML document to an existing project using the main menu (File | New | Other... | JavaFX | New FXML Document). You can place it in the current package.
2.2.6 Layout in JavaFX
JavaFX provides mechanisms for composing visual components (nodes), in many ways similar to the corresponding mechanisms of the javax.swing library, but unlike swing, layout elements are nodes in the user interface element tree. There are several types of standard containers (panels) that differ in the layout rules and formatting of child visual components. In the previous examples, the BorderPane and FlowPane containers have already been used. In general, standard containers can include the following:
Pane: the simplest panel with absolute positioning;BorderPaneworks similarly to theBorderLayoutof the Swing library; you can add five components:top,bottom,left,right, andcenter. in the latter case, the component tries to occupy the entire free space;FlowPaneautomatically adds items to the horizontal (vertical) row with the continuation in the next row (column);HBoxlays nodes in a horizontal row;-
VBoxlays nodes in a vertical row; -
AnchorPaneallows attachment of nodes to different sides of the container, or to its center, determining the appropriate distances; -
TilePanearranges elements in a grid of the same size; -
StackPaneplaces each new node on top of the previous node; allows you to create compound forms that support the dynamic change of its content; -
GridPaneallows you to arrange nodes in a dynamic grid, which allows you to combine adjacent cells; in its capabilities it is close toGridBagLayoutofjavax.swinglibrary.
All panels support the padding property, the GridPane, HBox and VBox panels also support the spacing property (the gap between the child nodes). A detailed example of the use of different panels can be found in the official Oracle tutorial with JavaFX.
2.2.7 Using Controls. Processing of Events
Classes of visual elements that are used in JavaFX are derived from the javafx.scene.layout.Region class, which is derived from the javafx.scene.Parent abstract class, whose base class is javafx.scene.Node. It is the properties of this class that determine the size and location of components on the container, the ability to create a hierarchy of objects.
Most visual controls based on their names and basic functionality are similar to the corresponding components of the javax.swing library. Unlike Swing, the properties of controls can be defined not only in the code, but also in the FXML document.
For example, the simplest control is the button for which the javafx.scene.control.Button class should be applied. The title of the button can be defined in the constructor, or set by using the setText() method. Properties can be defined in the function code or in the FXML document.
The most commonly used elements of the user interface defined in the javafx.scene.control package are the following:
- panels:
ToolBar,Accordion,SplitPane,TabPane,ScrollPane,TitledPane,MenuBar - non-editable text:
Label - buttons:
Button,MenuButton,SplitMenuButton,ToggleButton, - text controls:
TextField,TextArea,PasswordField - switches:
CheckBox,RadioButton(used together with theToggleGroup) - lsits:
ChoiceBox,ComboBox,ListView - menus:
Menu,ContextMenu,MenuItem - dialog boxed:
ColorPicker,DatePicker, - tabbles:
TableView,TreeTableView - indicators:
ProgressBar,ProgressIndicator - an HTML like label:
Hyperlink - a horizontal or vertical separator line:
Separator - a continuous or discrete range of valid numeric choices:
Slider - a view on to a tree root:
TreeView.
Additional elements can be found in packages javafx.scene.chart, javafx.scene.image, javafx.scene.media, etc. The javafx.scene.shape package provides the drawing of geometric shapes.
Like almost all graphical user interface libraries, JavaFX supports both the main and the context menus. The main menu is located inside the javafx.scene.control.MenuBar component. To create separate submenus, the javafx.scene.control.Menu class is used. You can create menu items using the javafx.scene.control.MenuItem class.
All Java SE Graphical User Interface Libraries support similar event handling mechanisms. All JavaFX event classes come from the java.util.EventObject class. The most common is the derived ActionEvent class that represents an event associated with the main use of the control (for example, by pressing a button). In order to process an event, you first have to register the handler by calling the setOnAction() method. The parameter of this method is the class object that implements the javafx.event.EventHandler<T extends Event> interface. The only method to be implemented is void handle(T eventObj). Since this interface is functional, lambda expressions are used in most cases to create nameless classes that implement it.
Sometimes it is advisable to get the source of an event (the object that initialized the event) for more accurate processing of the event. This object can be obtained by calling the getSource(), defined in java.util.EventObject class.
The best way to learn how to work with visual components and events is to analyze examples. Example 3.1 shows the work with text fields and a button, in example 3.2 demonstrates the work with the RadioButton buttons, Example 3.4 also shows working with the menu and TextArea.
2.2.8 Child and Dialog Windows
Like other libraries for creating graphical user interface applications, JavaFX provides tools for creating child windows - windows that appear after performing certain actions in the main application window. Typically, these windows contain controls for dialogue with the user. Such windows are called dialog windows (dialog boxes).
Dialog windows (dialog boxes) are special types of windows that allow the user to enter a limited number of data, contain a limited number of controls, allow the user to choose options for action, or inform the user. Dialog boxes are usually displayed when the program needs an answer for further work. Unlike regular windows, most dialog boxes cannot be expanded or collapsed, as well as resized. A special type of dialog boxes includes so-called modal dialogs. They do not allow you to continue working with the application until the modal window is closed. Using modal dialogs, for the most part, notify the user about some intermediate results, show warnings, error messages, enter separate data rows, etc.
To create a child window, you need to create a separate Stage type object. You should call the show() method for this object. If a new child window is a modal dialog, the showAndWait() method should be called. This function shows a new window and allows you to return to the previous one only after closing the new window.
JavaFX 8 (starting with JDK version 8.4) provides javafx.scene.control.Alert class that allows you to create standard dialogs. The windows options are defined in the constructor using the javafx.scene.control.Alert.AlertType enumeration. The following types of windows are defined:
AlertType.INFORMATION- standard information box with message;-
AlertType.WARNING- warning box with corresponding icon; AlertType.ERROR- error box with corresponding icon;AlertType.CONFIRMATION- question box withOKandCancelbuttons (you can also add other buttons).
There are also special classes for text input (javafx.scene.control.TextInputDialog), and javafx.scene.control.ChoiceDialog<T>, which allows the user to select a T-type element from the list. All of these classes are derived from the generic class javafx.scene.control.Dialog<T>.
Modal dialogs are often used to select files. The javafx.stage.FileChooser class allows you to select files for reading or writing. For example, if the current stage is called stage, so you can create a file dialog to open and receive an object of type java.io.File:
FileChooser chooser = new FileChooser();
File file;
// Show file selection window and check whether the user has confirmed his (her) choice:
if ((file = chooser.showOpenDialog(stage)) != null) {
    // Read from file
}
The parameter both of showOpenDialog() and showSaveDialog() functions is a reference to a window in the center of which the file dialog is located. If null is specified, the dialog box appears centered on the screen. You can use Example 3.3 to find out how to use the FileChooser class and events.
2.3 Working with Table Data in JavaFX
Work with tabular data is carried out using the component TableView. The main work of this component is a reflection of the properties of objects that are stored in the list of the generic type javafx.collections.ObservableList. The main difference of this list from traditional lists is the presence of a mechanism for automatic notification of visual components associated with ObservableList about changes in the values of elements. In addition to the ObservableList interface, the ObservableMap interface is also provided. To create an object that implements the ObservableList interface, use the static FXCollections.observableList() function with the "traditional" type parameter.
Using the TableView can be seen by example. Suppose a City class has been created:
package ua.in.iwanoff.java.fourth;

public class City {
    private String name;
    private int population;

    public City(String name, int population) {
        this.name = name;
        this.population = population;
    }

    public String getName() {
        return name;
    }

    public int getPopulation() {
        return population;
    }

    public void setName(String name) {
        this.name = name;
    }

    public void setPopulation(int population) {
        this.population = population;
    }

}
We need to create and fill out a list of cities and display this list in the main application window.
We create a new JavaFX application (File | New | Other... | JavaFX | JavaFX Project). In the Main class, we initialize several objects of type City, create a table, add columns, link them with the properties of the City class, and add the table to the main window. The source code will be:
package ua.in.iwanoff.java.fourth;

import javafx.application.Application;
import javafx.collections.FXCollections;
import javafx.collections.ObservableList;
import javafx.stage.Stage;
import javafx.scene.Scene;
import javafx.scene.control.TableColumn;
import javafx.scene.control.TableView;
import javafx.scene.control.cell.PropertyValueFactory;
import javafx.scene.layout.BorderPane;

public class Main extends Application {

    @Override
    public void start(Stage primaryStage) {
        // Fill in the list of cities:
        ObservableList<City> list = FXCollections.observableArrayList(
            new City("Kharkiv", 1_451_132),
            new City("Poltava", 295_950),
            new City("Kyiv", 2_868_702)
        );

        try {
            primaryStage.setTitle("Cities");
            BorderPane root = new BorderPane();

            // Create a table and add columns to it:
            TableView<City> table = new TableView<>();
            table.setItems(list);
            table.getColumns().clear();
            // The columnName column is associated with the name property:
            TableColumn<City, String> columnName = new TableColumn<>("Name");
            columnName.setCellValueFactory(new PropertyValueFactory<>("name"));
            // The columnPopulation column is associated with the population property:
            TableColumn<City, Integer> columnPopulation = new TableColumn<>("Population");
            columnPopulation.setCellValueFactory(new PropertyValueFactory<>("population"));
            // Add columns to the table:
            table.getColumns().add(columnName);
            table.getColumns().add(columnPopulation);
            // Add a table to the center of the panel:
            root.setCenter(table);

            Scene scene = new Scene(root, 300, 200);
            primaryStage.setScene(scene);
            primaryStage.show();
        }
        catch(Exception e) {
            e.printStackTrace();
        }
    }

    public static void main(String[] args) {
        launch(args);
    }
}
It should be noted that by clicking on the headings of the corresponding table columns you can automatically sort the data by the appropriate criterion.
In many applications, the table data needs to be edited. Editing requires some changes to the structure of the program, as well as the addition of new visual components.
The new structure of the program involves transferring the list of cities from the local visibility of the start() function to the Main class fields. This can be done using the Refactor | Convert Local Variable to Field menu function. Before applying this function, you should select the code of the corresponding definition. In the Convert Local Variable to Field dialog, all values can be left unchanged. The initialization code of the list can be moved to a separate method also using refactoring functions. This code should also be selected, and then use the Refactor | Extract Method... function. In the Extract Method dialog box, enter the method name, for example, initList, and click OK. The method is added to the class definition, and its call is automatically added to the code of the start() function, which used to initialize the list earlier. Similarly, the local variable table should be converted to a field, and the filling of the table should be carried out in a separate function, for example, initTable(). The code for the Main class now looks like this:
package ua.in.iwanoff.java.fourth;

import javafx.application.Application;
import javafx.collections.FXCollections;
import javafx.collections.ObservableList;
import javafx.stage.Stage;
import javafx.scene.Scene;
import javafx.scene.control.TableColumn;
import javafx.scene.control.TableView;
import javafx.scene.control.cell.PropertyValueFactory;
import javafx.scene.layout.BorderPane;

public class Main extends Application {
    private ObservableList<City> list;
    private TableView<City> table;

    @Override
    public void start(Stage primaryStage) {
        initList();
        try {
            primaryStage.setTitle("Cities");
            BorderPane root = new BorderPane();
            initTable();
            root.setCenter(table);
            Scene scene = new Scene(root, 300, 200);
            primaryStage.setScene(scene);
            primaryStage.show();
        }
        catch(Exception e) {
            e.printStackTrace();
        }
    }

    private void initTable() {
        table = new TableView<>();
        table.setItems(list);
        table.getColumns().clear();
        // The columnName column is associated with the name property:
        TableColumn<City, String> columnName = new TableColumn<>("Name");
        columnName.setCellValueFactory(new PropertyValueFactory<>("name"));
        // The columnPopulation column is associated with the population property:
        TableColumn<City, Integer> columnPopulation = new TableColumn<>("Population");
        columnPopulation.setCellValueFactory(new PropertyValueFactory<>("population"));
        // Add columns to the table:
        table.getColumns().add(columnName);
        table.getColumns().add(columnPopulation);
    }

    private void initList() {
        list = FXCollections.observableArrayList(
            new City("Kharkiv", 1_451_132),
            new City("Poltava", 295_950),
            new City("Kyiv", 2_868_702)
        );
    }

    public static void main(String[] args) {
        launch(args);
    }
}
We will add a button to the window to reload the source data. We can also add a button, pressing of which ensures the addition of a new empty table row for its further filling. The corresponding buttons can be positioned above and below the window. The code of adding buttons inside the start() method can be as follows:
    Button buttonReload = new Button("Reload data");
    buttonReload.setMaxWidth(Double.MAX_VALUE);
    buttonReload.setOnAction(event -> reload());
    root.setTop(buttonReload);
    Button buttonAddCity = new Button("Add city");
    buttonAddCity.setMaxWidth(Double.MAX_VALUE);
    buttonAddCity.setOnAction(event -> addCity());
    root.setBottom(buttonAddCity);
In the above code, each of the buttons is created with the text defined in the constructor. Setting the maximum width to Double.MAX_VALUE provides stretching the button to the full width of the window. The function parameters setOnAction() are lambda expressions in which separately implemented functions are called:
    private void reload() {
        initList();
        initTable();
    }

    private void addCity() {
        list.add(new City("", 0));
        initTable();
    }
Buttons are added to the panel, respectively, from the top and bottom.
Editing a table is done through the use of editing features provided by other visual components, such as TextField. The javafx.scene.control.cell.TextFieldTableCell class allows you to work with the table cell as with the text input field. Calling the setCellFactory() method for a particular column redefines the mechanism for manipulating columns in the column. In addition, you should add a callback function that handles the entered (changed) data.
The entire text of the program may look like this:
package ua.in.iwanoff.java.fourth;

import javafx.application.Application;
import javafx.collections.FXCollections;
import javafx.collections.ObservableList;
import javafx.stage.Stage;
import javafx.scene.Scene;
import javafx.scene.control.Button;
import javafx.scene.control.TableColumn;
import javafx.scene.control.TableView;
import javafx.scene.control.cell.PropertyValueFactory;
import javafx.scene.control.cell.TextFieldTableCell;
import javafx.scene.layout.BorderPane;
import javafx.util.converter.IntegerStringConverter;

public class Main extends Application {
    private ObservableList<City> list;
    private TableView<City> table;

    @Override
    public void start(Stage primaryStage) {
        initList();
        try {
            primaryStage.setTitle("Cities");
            BorderPane root = new BorderPane();
            table = new TableView<>();
            initTable();
            root.setCenter(table);
            Button buttonReload = new Button("Reload data");
            buttonReload.setMaxWidth(Double.MAX_VALUE);
            buttonReload.setOnAction(event -> reload());
            root.setTop(buttonReload);
            Button buttonAddCity = new Button("Add city");
            buttonAddCity.setMaxWidth(Double.MAX_VALUE);
            buttonAddCity.setOnAction(event -> addCity());
            root.setBottom(buttonAddCity);
            Scene scene = new Scene(root, 300, 200);
            primaryStage.setScene(scene);
            primaryStage.show();
        }
        catch(Exception e) {
            e.printStackTrace();
        }
    }

    private void reload() {
        initList();
        initTable();
    }

    private void addCity() {
        list.add(new City("", 0));
        initTable();
    }

    private void initTable() {
        table.setItems(list);
        table.getColumns().clear();
        table.setEditable(true);
        // The columnName column is associated with the name property:
        TableColumn<City, String> columnName = new TableColumn<>("Name");
        columnName.setCellValueFactory(new PropertyValueFactory<>("name"));
        columnName.setCellFactory(TextFieldTableCell.forTableColumn());
        columnName.setOnEditCommit(t ->
            ((City) t.getTableView().getItems().get(t.getTablePosition().getRow())).
            setName(t.getNewValue()));
        // The columnPopulation column is associated with the population property:
        TableColumn<City, Integer> columnPopulation = new TableColumn<>("Population");
        columnPopulation.setCellValueFactory(new PropertyValueFactory<>("population"));
        columnPopulation.setCellFactory(TextFieldTableCell.<City, Integer>forTableColumn(
            new IntegerStringConverter()));
        columnPopulation.setOnEditCommit(t ->
            ((City) t.getTableView().getItems().get(t.getTablePosition().getRow())).
            setPopulation(t.getNewValue()));

        // Add columns to the table:
        table.getColumns().add(columnName);
        table.getColumns().add(columnPopulation);
    }

    private void initList() {
        list = FXCollections.observableArrayList(
            new City("Kharkiv", 1_451_132),
            new City("Poltava", 295_950),
            new City("Kyiv", 2_868_702)
        );
    }

    public static void main(String[] args) {
        launch(args);
    }
}
2.4 Visual Designing Graphical User Interface Applications Using Scene Builder
Unlike visual design and setting up Swing components that embedded in the Eclipse environment as plug-ins (for example, Window Builder), for the visual editing of windows and components of JavaFX, different environments use the same application, the so-called Scene Builder. This software product is provided by Oracle and can be downloaded from http://www.oracle.com/technetwork/java/javafxscenebuilder-1x-archive-2199384.html. You can download the installation program, the you agree to the license terms, choose version 2 (or higher) for your operating system and install the application. After installing the Scene Builder in the Eclipse environment (with the installed e(fx)clipse plugin), specify the path to this application. In the Eclipse menu, select Window | Preferences, in the JavaFX tree, point to the full name of the application (SceneBuilder executable), such as C:\Program Files (x86)\Oracle\JavaFX Scene Builder 2.0\JavaFX Scene Builder 2.0.exe, and click OK.
You can start the editor through the Package Explorer context menu associated with the FXML document (Open with SceneBuilder). The main editor window consists of three columns: a component hierarchy on the left (Library), the main pane of editing the scene and the edit subwindow of the properties on the right side of the window (Insector).
The tabs according to the groups of components are allocated on the left column, the Properties, Layout and Code tabs are allocated on the right column. You can drag components and define their properties on the form. You can change some of the properties directly with the mouse (drag, resize, etc.), you can specify necessary values in the Properties and Layout tabs. In the Code tab, you can, if necessary, define the object's name fx:id), as well as for each component, you can specify the response to events.
In the preview mode (Preview | Show Preview in Window) you can interact with the layout to check the functionality of the future code.
Note: in order to work with the JavaFX Scene Builder application in the IntelliJ IDEA environment, in the settings window on the Languages & Frameworks | JavaFX specify the path to the application.
3 Sample Programs
3.1 Text Fields and Buttons
Assume that we want to create GUI application that allows user to enter two integer numbers in text fields and then obtains their sum in the third text field after clicking button.
The root container of our application will be FlowPane. So, it's enough to create three text boxes and one button and add them sequentially to the pane. The program will be as follows:
package ua.in.iwanoff.java.fourth;

import javafx.application.Application;
import javafx.event.Event;
import javafx.geometry.Pos;
import javafx.scene.Scene;
import javafx.scene.control.Alert;
import javafx.scene.control.Alert.AlertType;
import javafx.scene.layout.FlowPane;
import javafx.scene.control.Button;
import javafx.scene.control.TextField;
import javafx.stage.Stage;

public class TextFieldsAndButton extends Application {
    private Button button;
    private TextField field1, field2, field3;

    @Override
    public void start(Stage stage) throws Exception {
        stage.setTitle("Sum");
        FlowPane rootNode = new FlowPane(10, 10);// determine the size of the horizontal
                                                 // and vertical gaps between the elements
        rootNode.setAlignment(Pos.CENTER);
        Scene scene = new Scene(rootNode, 200, 200); // window size
        stage.setScene(scene);
        button = new Button("Find the sum");  // define the text on the button
        button.setOnAction(this::buttonClick);// define the function that handles the event
        field1 = new TextField();
        field2 = new TextField();
        field3 = new TextField();
        rootNode.getChildren().addAll(field1, field2, button, field3);
        stage.show();
    }

    private void buttonClick(Event event) {
        try {
            int i = Integer.parseInt(field1.getText());
            int j = Integer.parseInt(field2.getText());
            int k = i + j;
            field3.setText(k + "");
        }
        catch (NumberFormatException e1) {
            Alert alert = new Alert(AlertType.ERROR);
            alert.setTitle("Error");
            alert.setHeaderText("Invalid data!");
            alert.showAndWait();
        }
    }

    public static void main(String[] args) {
        launch(args);
    }

}
3.2 Using Radio Buttons
In the example below, along with the selection of the RadioButton button, the text of the selected button is displayed in the Label. In order for the buttons to work consistently, they are combined into a ToggleGroup group:
package ua.in.iwanoff.java.fourth;

import javafx.application.Application;
import javafx.event.ActionEvent;
import javafx.geometry.Insets;
import javafx.scene.Scene;
import javafx.scene.control.Label;
import javafx.scene.control.RadioButton;
import javafx.scene.control.ToggleGroup;
import javafx.scene.layout.VBox;
import javafx.stage.Stage;


public class ToggleGroupDemo extends Application {
    private Label label = new Label("No button");

    @Override
    public void start(Stage primaryStage) throws Exception {
        primaryStage.setTitle("Toggle Group Demo");

        RadioButton radioButtonFirst = new RadioButton("First");
        radioButtonFirst.setOnAction(this::showButtonText);
        RadioButton radioButtonSecond = new RadioButton("Second");
        radioButtonSecond.setOnAction(this::showButtonText);
        RadioButton radioButtonThird = new RadioButton("Third");
        radioButtonThird.setOnAction(this::showButtonText);

        ToggleGroup radioGroup = new ToggleGroup();
        radioButtonFirst.setToggleGroup(radioGroup);
        radioButtonSecond.setToggleGroup(radioGroup);
        radioButtonThird.setToggleGroup(radioGroup);
        VBox vbox = new VBox(radioButtonFirst, radioButtonSecond, radioButtonThird, label);
        vbox.setSpacing(10);
        vbox.setPadding(new Insets(10, 10, 10, 10));
        Scene scene = new Scene(vbox, 150, 120);
        primaryStage.setScene(scene);
        primaryStage.show();

    }

    private void showButtonText(ActionEvent actionEvent) {
        label.setText(((RadioButton)actionEvent.getSource()).getText());
    }

    public static void main(String[] args) {
        Application.launch(args);
    }

}
3.3 Working with the File Dialogs
Suppose we need to read two numbers from a text file, and write down their sum in another text file. The window will contain two buttons - to select the input and output files respectively. We can offer such a program:
package ua.in.iwanoff.java.fourth;

import java.io.File;
import java.io.FileWriter;
import java.io.PrintWriter;
import java.util.Scanner;

import javafx.application.Application;
import javafx.event.ActionEvent;
import javafx.geometry.Pos;
import javafx.scene.Scene;
import javafx.scene.control.Alert;
import javafx.scene.control.Button;
import javafx.scene.control.Alert.AlertType;
import javafx.scene.layout.FlowPane;
import javafx.stage.FileChooser;
import javafx.stage.Stage;

public class SumWriter extends Application {
    private double a, b;
    private FileChooser chooser;
    private File file;

    @Override
    public void start(Stage stage) throws Exception {
        stage.setTitle("Sum");
        FlowPane rootNode = new FlowPane(10, 10);// determine the size of the horizontal
                                                 // and vertical gaps between the elements
        rootNode.setAlignment(Pos.CENTER);
        Scene scene = new Scene(rootNode, 200, 100); // window size
        stage.setScene(scene);
        Button buttonOpen = new Button("Load data");  // define the text on the button
        buttonOpen.setOnAction(this::buttonOpenClick);// define the function that handles an event
        Button buttonSave = new Button("Save sum");   // define the text on the button
        buttonSave.setOnAction(this::buttonSaveClick);// define the function that handles an event
        rootNode.getChildren().addAll(buttonOpen, buttonSave);
        chooser = new FileChooser();
        chooser.setInitialDirectory(new File("."));
        stage.show();
    }

    private void buttonOpenClick(ActionEvent event) {
        if ((file = chooser.showOpenDialog(null)) != null) {
            readFromFile();
        }
    }

    private void buttonSaveClick(ActionEvent event) {
        if ((file = chooser.showSaveDialog(null)) != null) {
            writeToFile();
        }
    }

    private void readFromFile() {
        try (Scanner scanner = new Scanner(file)) {
            a = scanner.nextDouble();
            b = scanner.nextDouble();
        }
        catch (Exception e) {
            Alert alert = new Alert(AlertType.ERROR);
            alert.setTitle("Error");
            alert.setHeaderText("Error reading from file!");
            alert.showAndWait();
        }
    }

    private void writeToFile() {
        try (PrintWriter out = new PrintWriter(new FileWriter(file))) {
            out.println(a + b);
            out.close();
        }
        catch (Exception e) {
            Alert alert = new Alert(AlertType.ERROR);
            alert.setTitle("Error");
            alert.setHeaderText("Cannot create a file!");
            alert.showAndWait();
        }
    }

    public static void main(String[] args) {
        launch(args);
    }

}
3.4 GUI Application for Processing Data about Censuses
Suppose we need to create a graphical user interface program that allows the user to enter and edit population census data, store data in an XML file, read data from previously created XML files, edit data, search for data according to the specific criteria, sort data, and storing data in a new file.
To the previously created project, we add a new package that will contain graphical user interface classes, including the main class controller, FXML documents, and additional controllers.
In the Eclipse environment, using the New | Other... | JavaFX | Classes | JavaFX Main Class menu function we create a new class named CensusesFX. Its content will be as follows:
package ua.in.iwanoff.java.fourth;

import javafx.application.Application;
import javafx.stage.Stage;

public class CensusesFX extends Application {

    @Override
    public void start(Stage primaryStage) {

    }

    public static void main(String[] args) {
        launch(args);
    }
}
Also, a new FXML document ((New | Other... | JavaFX | New FXML Document) named CensusesForm.fxml should be added to the package. Its content will be the following:
<?xml version="1.0" encoding="UTF-8"?>

<?import javafx.scene.layout.BorderPane?>

<BorderPane xmlns:fx="http://javafx.com/fxml/1">
    <!-- TODO Add Nodes -->
</BorderPane>
Add a reference to the FXML document class and create a scene (the corresponding statements can be copied from the code of the previous examples):
package ua.in.iwanoff.java.fourth;

import javafx.application.Application;
import javafx.fxml.FXMLLoader;
import javafx.scene.Scene;
import javafx.scene.layout.BorderPane;
import javafx.stage.Stage;

public class CensusesFX extends Application {

    @Override
    public void start(Stage primaryStage) {
        try {
            BorderPane root = FXMLLoader.load(getClass().getResource("CensusesForm.fxml"));
            Scene scene = new Scene(root, 700, 500);
            primaryStage.setScene(scene);
            primaryStage.setTitle("Population censuses");
            primaryStage.show();
        }
        catch(Exception e) {
            e.printStackTrace();
        }
    }

    public static void main(String[] args) {
        launch(args);
    }
}
It is also necessary to add a controller class:
package ua.in.iwanoff.java.fourth;

public class CensusesConroller {

}
Further work involves adding and adjusting visual components using the Scene Builder application. We start the application using the context menu concerned with CensusesForm.fxml file in Package Explorer (Open with SceneBuilder). First, we add a reference to the controller class. On the Controller tab in the left part of the Scene Builder window, in the ControllerClass text field, we enter the name of the controller class, specifying all subfolders. In our case, this is ua.in.iwanoff.java.fourth.CensusesConroller.
First we add the main menu. On the Controls panel, in the left part of the window (palette), we find the MenuBar component and add it to the top of the root container (the insert TOP position in the hierarchy of objects). The main menu that we have added already contains the File submenu (with theClose item), Edit (with the Delete item), and Help (with the About item). From the Menu tab we can add new submenus (Menu) and individual items (MenuItem). In our case, we'll also add the submenu Run and get the following main menu:
FilesubmenuwithNew,Open...,Save...andExititemsEditsubmenu withAdd rowandRemove last rowitemsRunsubmenu with theSort by populationandSort by commentsitems;Helpsubmenu with theAbout...item.
We can add a Separator component between the Save... and Exit items.
On the left side of the root panel, we need to place another panel (AnchorPane) for allocation of some controls: buttons, input lines, and the area of the search results. In particular, we'll add a Label with the text Text to search:, the TextField line for entering words (sequence of letters) for the search in comments, as well as the corresponding buttons with the text Search for a word and Search the letter sequence. At the bottom of the added panel, we place the TextArea component to output the search results. For TextField and TextArea components, we need to define the names, respectively textFieldCountry, textFieldArea, textFieldText, and textAreaResults, since the contents of these components need to be accessed in the program.
For the textAreaResults results output area, we specify the value of the AnchorPane.bottomAnchor property, which will automatically change the height if the main window is resized. You can set this property directly in the text of an FXML document or with the help of Scene Builder by defining the required value in the lower text field of the Anchor Pane Constraints symbolic image in the Layout tab in the right part of the window.
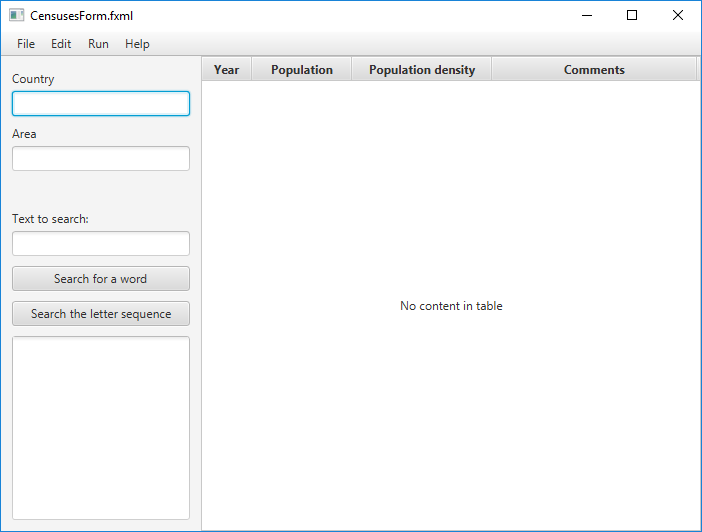
In the central part of the root pane, we place the TableView component, which will display and edit the population census data. From the beginning, this component contains two columns (TableColumn) with headings C1 and C2. This text should be changed to Year and Population. Two more columns (Population density and Comments) should be added to the table. The table and columns should also be renamed, respectively, tableViewCensuses, tableColumnYear, tableColumnPopulation, tableColumnDensity, and tableColumnComments. For the entire table (tableViewCensuses), and for all columns, besides tableColumnDensity, the editable property should be set to true, and for tableColumnDensity, it should be set to false. In the preview (Preview | Show Preview in Window) of the Scene Builder editor, the future main window of the application will look like this:
Now we can develop controller. An earlier created XMLCountry class will act as a model. We can add a reference to the controller class. Named components must match private fields that can be generated automatically. The mechanism for generating code using Quick Fix context menu has been described earlier.
It is also necessary to add event handler methods related to menu items, buttons, and text changes. To add an event, we create the corresponding functions with annotation and a parameter of ActionEvent type. References to these functions can be added in Scene Builder or manually. The text of the CensusesForm.fxml file may be as follows:
<?xml version="1.0" encoding="UTF-8"?>

<?import javafx.scene.control.*?>
<?import java.lang.*?>
<?import javafx.scene.layout.*?>
<?import javafx.scene.layout.BorderPane?>

<BorderPane prefHeight="500.0" prefWidth="700.0"
            xmlns="http://javafx.com/javafx/8" xmlns:fx="http://javafx.com/fxml/1"
            fx:controller="ua.in.iwanoff.java.fourth.CensusesConroller">
    <top>
        <MenuBar BorderPane.alignment="CENTER">
            <menus>
                <Menu mnemonicParsing="false" text="File">
                    <items>
                        <MenuItem mnemonicParsing="false" text="New" onAction="#doNew"/>
                        <MenuItem mnemonicParsing="false" text="Open..." onAction="#doOpen"/>
                        <MenuItem mnemonicParsing="false" text="Save..." onAction="#doSave"/>
                        <MenuItem mnemonicParsing="false" text="Exit" onAction="#doExit"/>
                    </items>
                </Menu>
                <Menu mnemonicParsing="false" text="Edit">
                    <items>
                        <MenuItem mnemonicParsing="false" text="Add row" onAction="#doAdd"/>
                        <MenuItem mnemonicParsing="false" text="Remove last row" onAction="#doRemove"/>
                    </items>
                </Menu>
                <Menu mnemonicParsing="false" text="Run">
                    <items>
                        <MenuItem mnemonicParsing="false" text="Sort by population" onAction="#doSortByPopulation"/>
                        <MenuItem mnemonicParsing="false" text="Sort by comments" onAction="#doSortByComments"/>
                    </items>
                </Menu>
                <Menu mnemonicParsing="false" text="Help">
                    <items>
                        <MenuItem mnemonicParsing="false" text="About..." onAction="#doAbout"/>
                    </items>
                </Menu>
            </menus>
        </MenuBar>
    </top>
    <left>
        <AnchorPane prefHeight="472.0" prefWidth="200.0" BorderPane.alignment="CENTER">
            <children>
                <Label text="Country" AnchorPane.leftAnchor="11.0"
                       AnchorPane.rightAnchor="11.0" AnchorPane.topAnchor="14.0" />
                <TextField fx:id="textFieldCountry" prefHeight="22.0" AnchorPane.leftAnchor="11.0"
                           AnchorPane.rightAnchor="11.0" AnchorPane.topAnchor="35.0" onAction="#nameChanged" />
                <Label text="Area" AnchorPane.leftAnchor="11.0"
                       AnchorPane.rightAnchor="11.0" AnchorPane.topAnchor="69.0" />
                <TextField fx:id="textFieldArea" prefHeight="22.0" AnchorPane.leftAnchor="11.0"
                           AnchorPane.rightAnchor="11.0" AnchorPane.topAnchor="90.0" onAction="#areaChanged" />
                <Label text="Text to search:" AnchorPane.leftAnchor="11.0"
                       AnchorPane.rightAnchor="11.0" AnchorPane.topAnchor="154.0" />
                <TextField fx:id="textFieldText" prefHeight="22.0" AnchorPane.leftAnchor="11.0"
                           AnchorPane.rightAnchor="11.0" AnchorPane.topAnchor="175.0" />
                <Button mnemonicParsing="false" prefHeight="22.0"
                        text="Search for a word" AnchorPane.leftAnchor="11.0"
                        AnchorPane.rightAnchor="11.0" AnchorPane.topAnchor="210.0" onAction="#doSearchByWord"/>
                <Button mnemonicParsing="false" prefHeight="22.0"
                        text="Search the letter sequence" AnchorPane.leftAnchor="11.0"
                        AnchorPane.rightAnchor="11.0" AnchorPane.topAnchor="245.0" onAction="#doSearchBySubstring" />
                <TextArea fx:id="textAreaResults" AnchorPane.bottomAnchor="11.0"
                          AnchorPane.leftAnchor="11.0" AnchorPane.rightAnchor="11.0"
                          AnchorPane.topAnchor="280.0" />
            </children>
        </AnchorPane>
    </left>
    <center>
        <TableView fx:id="tableViewCensuses" prefHeight="473.0" prefWidth="114.0"
                   BorderPane.alignment="CENTER" editable="true" >
            <columns>
                <TableColumn fx:id="tableColumnYear" prefWidth="50.0" text="Year" editable="true" />
                <TableColumn fx:id="tableColumnPopulation" prefWidth="100.0" text="Population"  editable="true" />
                <TableColumn fx:id="tableColumnDensity" prefWidth="140.0" text="Population density"  editable="false" />
                <TableColumn fx:id="tableColumnComments" prefWidth="205.0" text="Comments"  editable="true" />
            </columns>
        </TableView>
    </center>
</BorderPane>
Some auxiliary methods are useful for implementing event handlers. We can list all the code for the CensusesConroller class:
package ua.in.iwanoff.java.fourth;

import java.io.File;
import java.io.IOException;
import java.net.URL;
import java.util.ArrayList;
import java.util.List;
import java.util.ResourceBundle;

import javax.xml.bind.JAXBException;

import ua.in.iwanoff.java.third.XMLCountry;
import ua.in.iwanoff.oop.first.AbstractCensus;

import javafx.fxml.FXML;
import javafx.fxml.Initializable;
import javafx.scene.control.Alert;
import javafx.scene.control.TableColumn.CellEditEvent;
import javafx.scene.control.Label;
import javafx.scene.control.TextField;
import javafx.scene.control.TextArea;
import javafx.scene.control.TableView;
import javafx.scene.control.TableColumn;
import javafx.scene.control.TableCell;
import javafx.scene.control.Alert.AlertType;
import javafx.scene.control.cell.PropertyValueFactory;
import javafx.scene.control.cell.TextFieldTableCell;
import javafx.stage.FileChooser;
import javafx.util.converter.IntegerStringConverter;
import javafx.application.Platform;
import javafx.collections.FXCollections;
import javafx.collections.ObservableList;
import javafx.event.ActionEvent;

/**
 * Controller class associated with the CensusesForm.fxml document
 *
 * Implementation of the Initializable interface provides the ability to initialize
 * the visual components described in the FXML document in the initialize() method
 *
 */
public class CensusesConroller implements Initializable {
    // Reference to the model class:
    private XMLCountry country = new XMLCountry();

    // List whose contents will be displayed in the table:
    private ObservableList<AbstractCensus> observableList;

    /**
     * Dialog box for an arbitrary message
     *
     * @param message message text
     */
    public static void showMessage(String message) {
        Alert alert = new Alert(AlertType.INFORMATION);
        alert.setTitle("");
        alert.setHeaderText(message);
        alert.showAndWait();
    }

    /**
     * Error dialog box
     *
     * @param message message text
     */
    public static void showError(String message) {
        Alert alert = new Alert(AlertType.ERROR);
        alert.setTitle("Error");
        alert.setHeaderText(message);
        alert.showAndWait();
    }

    /**
     * Create a file selection dialog
     *
     * @param title window title
     */
    public static FileChooser getFileChooser(String title) {
        FileChooser fileChooser = new FileChooser();
        // We are starting to search from the current folder:
        fileChooser.setInitialDirectory(new File("."));
        // Set filters to find files:
        fileChooser.getExtensionFilters().add(
                new FileChooser.ExtensionFilter("XML files (*.xml)", "*.xml"));
        fileChooser.getExtensionFilters().add(
                new FileChooser.ExtensionFilter("All files (*.*)", "*.*"));
        // Specify the title of the window:
        fileChooser.setTitle(title);
        return fileChooser;
    }

    // Fields related to visual elements:

    @FXML private TextField textFieldCountry;
    @FXML private TextField textFieldArea;
    @FXML private TextField textFieldText;
    @FXML private TextArea textAreaResults;
    @FXML private TableView<AbstractCensus> tableViewCensuses;
    @FXML private TableColumn<AbstractCensus, Integer> tableColumnYear;
    @FXML private TableColumn<AbstractCensus, Integer> tableColumnPopulation;
    @FXML private TableColumn<AbstractCensus, Number> tableColumnDensity;
    @FXML private TableColumn<AbstractCensus, String> tableColumnComments;

    /**
     * The method of initializing the visual components described in the FXML document
     *
     */
    @Override
    public void initialize(URL location, ResourceBundle resources) {
        // Write an empty string instead of "No content in table":
        tableViewCensuses.setPlaceholder(new Label(""));
    }

    // Event handlers:

    @FXML
    private void doNew(ActionEvent event) {
        country = new XMLCountry();
        observableList = null;
        textFieldCountry.setText("");
        textFieldArea.setText("");
        textFieldText.setText("");
        textAreaResults.setText("");
        tableViewCensuses.setItems(null);
        tableViewCensuses.setPlaceholder(new Label(""));
    }

    @FXML
    private void doOpen(ActionEvent event) {
        FileChooser fileChooser = getFileChooser("Open an XML file");
        File file;
        if ((file = fileChooser.showOpenDialog(null)) != null) {
            try {
                country.readFromFile(file.getCanonicalPath());
                // Fill in the text fields with read data:
                textFieldCountry.setText(country.getName());
                textFieldArea.setText(country.getArea() + "");
                textAreaResults.setText("");
                // Clear and update the table:
                tableViewCensuses.setItems(null);
                updateTable();
            }
            catch (IOException e) {
                showError("File not found");
            }
            catch (JAXBException e) {
                showError("Invalid file format");
            }
        }
    }

    @FXML
    private void doSave(ActionEvent event) {
        FileChooser fileChooser = getFileChooser("Save an XML file");
        File file;
        if ((file = fileChooser.showSaveDialog(null)) != null) {
            try {
                updateSourceData(); // update the data in the model
                country.writeToFile(file.getCanonicalPath());
                showMessage("Results saved successfully");
            }
            catch (Exception e) {
                showError("Error writing to file");
            }
        }
    }

    @FXML
    private void doExit(ActionEvent event) {
        Platform.exit(); // correct completion of the JavaFX application
    }

    @FXML
    private void doAdd(ActionEvent event) {
        country.addCensus(0, 0, "");
        updateTable(); // create new data
    }

    @FXML
    private void doRemove(ActionEvent event) {
        // We cannot remove the row if there is no data:
        if (observableList == null) {
            return;
        }
        // If there are rows, delete the last one:
        if (observableList.size() > 0) {
            observableList.remove(observableList.size() - 1);
        }
        // If there are no rows, we indicate that the data is missing:
        if (observableList.size() <= 0) {
            observableList = null;
        }
    }

    @FXML
    private void doSortByPopulation(ActionEvent event) {
        updateSourceData();
        country.sortByPopulation();
        updateTable();
    }

    @FXML
    private void doSortByComments(ActionEvent event) {
        updateSourceData();
        country.sortByComments();
        updateTable();
    }

    @FXML
    private void doAbout(ActionEvent event) {
        Alert alert = new Alert(AlertType.INFORMATION);
        alert.setTitle("About...");
        alert.setHeaderText("Population censuses data");
        alert.setContentText("Version 1.0");
        alert.showAndWait();
    }


    @FXML
    private void nameChanged(ActionEvent event) {
        // When the user changed the data in textFieldCountry,
        // we automatically update the name:
        country.setName(textFieldCountry.getText());
    }

    @FXML
    private void areaChanged(ActionEvent event) {
        // When the user changed the data in textFieldArea, we automatically
        // update the values of the territory and population density:
        try {
            double area = Double.parseDouble(textFieldArea.getText());
            country.setArea(area);
            setDensity();
        }
        catch (NumberFormatException e) {
            // If an error, we return, as it was:
            textFieldArea.setText(country.getArea() + "");
        }
    }

    @FXML
    private void doSearchByWord(ActionEvent event) {
        // Updating data:
        updateSourceData();
        textAreaResults.setText("");
        for (int i = 0; i < country.censusesCount(); i++) {
            AbstractCensus c = country.getCensus(i);
            if (c.containsWord(textFieldText.getText())) {
                showResults(c);
            }
        }
    }

    @FXML
    private void doSearchBySubstring(ActionEvent event) {
        // Updating data:
        updateSourceData();
        textAreaResults.setText("");
        for (int i = 0; i < country.censusesCount(); i++) {
            AbstractCensus c = country.getCensus(i);
            if (c.containsSubstring(textFieldText.getText())) {
                showResults(c);
            }
        }
    }

    private void showResults(AbstractCensus census) {
        textAreaResults.appendText("Census of the " + census.getYear() + " year.\n");
        textAreaResults.appendText("Comments:" + census.getComments() + "\n");
        textAreaResults.appendText("\n");
    }

    private void updateSourceData() {
        // Rewriting data into the model from observableList
        country.clearCensuses();
        for (AbstractCensus c : observableList) {
            country.addCensus(c);
        }
    }

    private void setDensity() {
        // Determine the mechanism of automatic recalculation of cells
        // for tableColumnDensity when other data changes:
        tableColumnDensity.setCellFactory(cell -> new TableCell<AbstractCensus, Number>() {
            @Override
            protected void updateItem(Number item, boolean empty) {
                int current = this.getTableRow().getIndex();
                if (observableList != null && current >= 0 &&
                        current < observableList.size() && country.getArea() > 0) {
                    double population = observableList.get(current).getPopulation();
                    double density = population / country.getArea();
                    setText(String.format("%7.2f", density));
                }
                else {
                    setText("");
                }
            }
        });
    }

    private void updateYear(CellEditEvent<AbstractCensus, Integer> t) {
        // Update year data:
        AbstractCensus c = t.getTableView().getItems().get(t.getTablePosition().getRow());
        c.setYear(t.getNewValue());
    }

    private void updatePopulation(CellEditEvent<AbstractCensus, Integer> t) {
        // Update population data:
        AbstractCensus c = t.getTableView().getItems().get(t.getTablePosition().getRow());
        c.setPopulation(t.getNewValue());
        setDensity(); // recalculate population density
    }

    private void updateComments(CellEditEvent<AbstractCensus, String> t) {
        // Update comments:
        AbstractCensus c = t.getTableView().getItems().get(t.getTablePosition().getRow());
        c.setComments(t.getNewValue());
    }

    private void updateTable() {
        // Fill in the observableList:
        List<AbstractCensus> list = new ArrayList<>();
        observableList = FXCollections.observableList(list);
        for (int i = 0; i < country.censusesCount(); i++) {
            list.add(country.getCensus(i));
        }
        tableViewCensuses.setItems(observableList);

        // We specify the columns associated with their property
        // and the mechanism of editing, depending on the type of cells:
        tableColumnYear.setCellValueFactory(new PropertyValueFactory<>("year"));
        tableColumnYear.setCellFactory(TextFieldTableCell.forTableColumn(new IntegerStringConverter()));
        tableColumnYear.setOnEditCommit(t -> updateYear(t));
        tableColumnPopulation.setCellValueFactory(new PropertyValueFactory<>("population"));
        tableColumnPopulation.setCellFactory(TextFieldTableCell.forTableColumn(new IntegerStringConverter()));
        tableColumnPopulation.setOnEditCommit(t -> updatePopulation(t));
        tableColumnDensity.setSortable(false); // this column cannot be sorted automatically
        setDensity();
        tableColumnComments.setCellValueFactory(new PropertyValueFactory<>("comments"));
        tableColumnComments.setCellFactory(TextFieldTableCell.forTableColumn());
        tableColumnComments.setOnEditCommit(t -> updateComments(t));
    }

}
The work of the program can be improved by switching the availability of individual elements using the setDisable() method depending on the state of the program.
4 Exercises
- Create a graphical user interface application in which user enters two strings in two text fields, and after clicking the button receives the concatenated string in the third text filed.
- Create a graphical user interface application in which user enters two floating point numbers in two text fields, and after clicking the button receives the product of these numbers in the third text filed.
- Create a graphical user interface application in which user enters two integer numbers in two text fields, and after clicking the button receives the product of these numbers in a separate dialog box.
5 Quiz
- What Java libraries are used for creation of GUI applications?
- What is an applet?
- What is the idea of event-driven programming?
- What is JavaFX? What are the benefits of JavaFX?
- What is MVC?
- What is FXML? What are the benefits of FXML?
- What is the layout and how is it implemented in JavaFX?
- What standard containers does JavaFX provide and how are they different?
- How are the
RadioButtonbuttons working? - What are the features of modal dialog windows?
- How JavaFX uses standard file choose windows?
- How to work with tabular data in JavaFX?
- What is
ObservableList? - How to associate table columns with properties of objects in a list?
- How to provide editing table cells in JavaFX?
- How to provide the visual editing of the application window of the graphical user interface?